Tutorial: Rainbow Necklace
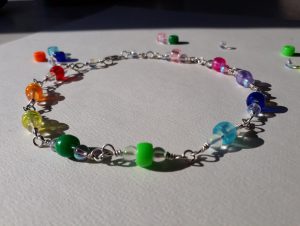
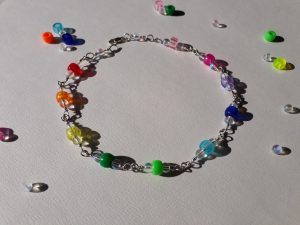
Inspired by my reading of ‘Beading for the Absolute Beginner’ by Liz Thornton and Jean Power (999 A160), this month I have decided to make a rainbow bead necklace in honour of our wonderful NHS. In true lockdown style, I used the materials I had to hand, so similarly tailor your design accordingly and adapt and change where necessary.
You will need:
silver wire approx.0.7 – 0.8mm (I used HSA 080, around 100cm)
jump rings 5mm and 6mm (I used NVH H50 and NVH H60)
strong silver clasp (I used NVF L11)
plastic rainbow coloured beads 8mm
snipe nosed pliers if possible
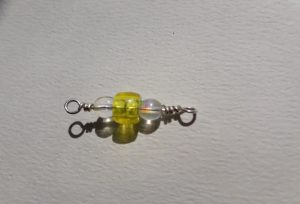
This project uses a series of double ended, wrapped loops which are joined together to create a necklace. Obviously, the necklace can be any length you choose, just add or takeaway components to achieve the look you want. My necklace is choker length and uses a total of 12 double wrapped loops, but remember the number of loops required will depend on the size of beads you use and the length of the components you create; mine were on average about 3cm in length.
To make:
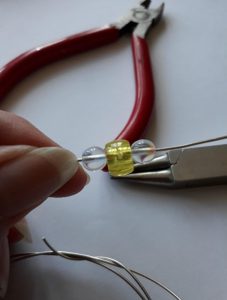
- Thread your chosen beads onto the wire and cut it to length, approximately 8cm longer than the beads. (I chose to cut the wire once the component was complete to create less waste, but this does make the whole process much more difficult).
- Leaving around 4cm excess, using snipe or flat nosed pliers, bend the wire at a right angle.
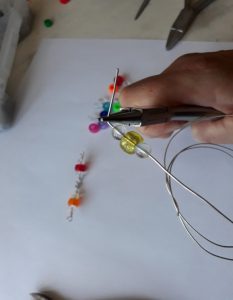
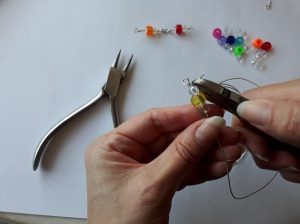
- Hold the wire in your round pliers and bend it round to form a loop. You can do this with your fingers or by pulling it with a pair of flat pliers. Pull the wire round until it crosses over fully.
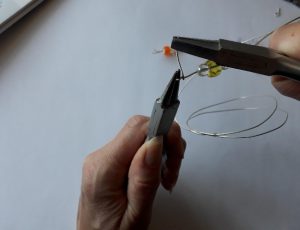
- Change hands so you are holding the round pliers in your less dominant hand and clamp the end of the wire in your flat pliers. Bring it round the shaft of the wire, wrapping it tightly at the base of the hoop you have just made. Continue to wrap and pull tightly until you reach the beads.
- Cut off the wire, smooth with a file if needed and push the end in with flat pliers so it is neat and doesn’t stick out. I found parallel pliers better for this as I don’t have snipe nosed pliers but if you have crimping pliers, these are ideal.
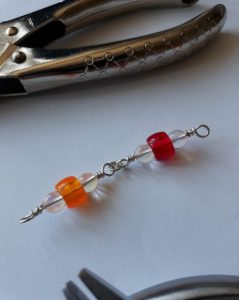
- Repeat the process using the opposite end of the wire to secure your beads and complete the finished double wrapped loop.
- Once you have made a second wrapped loop component, join them together with a jump ring and you can begin to work out how many you will need to complete the necklace.
- When the required length is reached, add the clasp to one end using a jump ring and stand back and admire your creation!
Hints and tips:
- Experiment with different sizes and types of beads, this will create a more interesting result. My glass beads are iridescent so they catch the light nicely, whilst the basic plastic examples provide the rainbow of colour I was after.
- Heavy jump rings give much more strength to the finished piece and are less likely to be pulled open when the necklace is worn.
- Always ensure your wire will go through the hole in your beads.(Sounds obvious but some internal holes are tiny). Check the details before you commit to any purchase.
- Don’t worry if your wrapped loops are not perfect. Mine are not perfect but the finished result is still pretty and effective.
- Enjoy the process. Chain making is extremely therapeutic and the perfect activity for a lazy Sunday afternoon. There is no need to rush as you can always pick up where you left off at a later time.
Written by Joanna Varney
Joanna has worked in and around the jewellery industry for well over 20 years. She has designed and created her own pieces as a designer maker, as well as working in jewellery retail on a much larger scale, producing designs and NPD for some of the UK’s largest high street retailers
The post Tutorial: Rainbow Necklace appeared first on The Bench.
source https://www.cooksongold.com/blog/beads/tutorial-rainbow-necklace
Comments
Post a Comment