How To Claw Set A Stone
 A classic looking setting and a popular option for presenting a faceted gemstone – the claw setting is a go-to technique for many jewellers. But how do you do it? We’ll talk you through how to claw set a stone, step by step and we’ll discuss all the tools needed and their purposes. You’ll also find a visual aid of some of the more advanced gemstone setting techniques out there.
Tools needed for making a claw setting
Before you get started with the claw setting tutorial, there are a few key pieces of kit you’ll need for making a claw setting:
- 1mm wire – use 1mm wire in an alloy of your choosing for the base of the setting.
- Solder paste – you’ll need solder paste to attach the joins to the wire frame.
- A hand torch – make sure you have a hand torch for the soldering element of the process.
- Safe pickling powder – pick up some safe pickling powder to remove any excess residue from using the hand torch.
- Reverse action tweezers – use reverse action tweezers for handling the design when using the pickling solution.
- A pair of side cutters – if the claws aren’t the required size, you can use side cutters to cut them down.
- A set of needle files or a graver – you can use either a needle file or a graver to cut any finer indentations into the setting.
- Polishing equipment – make sure you have enough polishing equipment to finish off your design.
- A pair of flat nose pliers with nylon jaws – these pliers are used for pushing the claws over the stone.
How to make a claw setting: step by step
Whether you’re making claw settings for pendants or earrings – the premise is the same. But if you’re set on using this setting on a ring, read our blog on how to set a stone in a 4-claw ring. For any other form of claw setting, follow our simple steps below:
- To create the backing, shape your wire into a ring so that the diameter is just smaller than the surface of the stone – roughly 1-2mm away from the edge.
- Remove any excess wire from your ring with your side cutters, then file down the ends of the wire. This helps to ensure it is all flush before soldering.
- To make the prongs, cut the wire so that they’re long enough to wrap around the sides of the stone. To gauge this, stand the wire up against the stone and cut at about double the stone’s height. You need to cut at least 4 prongs to hold the stone in place, but you can add more if you desire.
- Using a soldering block, place the prongs around the wire frame where you’d like them to sit. When you’re happy with the positioning, apply a small amount of soldering paste to the joins and use a little pressure to add the prongs.
- Now it’s time to use the hand torch. Heat the wire frame until the solder flows, then when all the joins have been soldered – use your tweezers to place the piece into the safe pickling solution to remove any leftover fire residue.
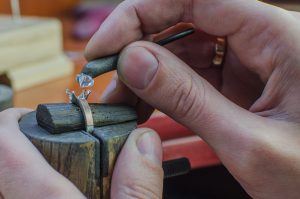
- After the wire frame has been in the solution for 3-5 minutes, add your stone to the frame and gently push the claws so that they point upwards at a 90° angle. Need a little extra help? Use your flat nose pliers to help shape the claws if you’re finding it difficult with your fingers.
- Before continuing, make sure your stone is sitting securely in the frame. Remove the stone, then trim the length of the claws so they hold the stone in place without coming out onto the stone’s surface too much – and make sure all excess solder is removed.
- Once this is done, you’re ready to start polishing your piece and setting your stone. Gently push the claws with your nylon jawed flat nose pliers so that they enclose the frame. Your stone should now sit safely in the setting, but for more peace of mind you can add a little glue to the underbelly of the stone and frame.
And there you have it! Now you know how to claw set a stone – why not try out some other setting techniques? Just make sure you’re prepared with all the jewellery tools and bullion before you begin.
The post How To Claw Set A Stone appeared first on The Bench.
source https://www.cooksongold.com/blog/how-to-guides/how-to-claw-set-a-stone


Comments
Post a Comment