How To Make Polymer Clay Beads
Make your own polymer clay beads and create bold, statement jewellery pieces. From necklaces to earrings, experiment with designs, shapes and colours and bring your jewellery designs to life – it’s a fun hobby and a great way to make bespoke jewellery. Discover our beginner’s guide on how to make polymer clay beads today.
What do you need to make polymer clay beads?
Using the right tools and equipment will help you to create high-quality polymer clay beads. We would recommend using:
- Fimo clay – in the colour(s) of your choice. Using clay as fresh as possible will help to prevent cracking.
- A hard, flat surface – like a workmat, tile or sheet of glass
- A needle tool or toothpick
- A ruler, to size your beads
- Sand paper
- Varnish and a clean brush (if you wish to seal your beads and make them shiny)
- A clean work surface: dust and clean before you start, as polymer clay is soft and will pick up anything that it comes into contact with
How to make Fimo clay beads
One of the easiest ways to make polymer clay beads is to start with a polymer ‘snake’, which can be made by cutting your block of clay into strips and rolling it out into a snake-like shape.
To create a simple bead design, take two sticks of coloured polymer clay and twist or roll them together to get a marbled effect – then form this into your desired shape. Play around with wrapping, folding and rolling different coloured clays together to create new designs and patterns. When making smaller beads, keep stretching the clay out into a longer snake – using your first and middle fingers to keep a uniform shape and thickness throughout.
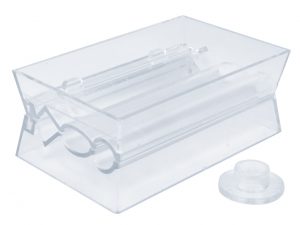
 Once you’ve reached your desired width and shape, cut the clay into equal pieces to create your individual beads – a ruler will help you to be more precise and will result in more evenly sized beads. Rolling the clay between the palm of your hand and a flat, smooth surface will help you get a round ball, or use a Fimo Magic Roller for an even easier solution. Simply take your ball of clay and place it in one of the shaped slots, gently moving the cover back and forth to create an evenly shaped bead.
Use a cocktail stick or a needle tool to put the hole in the top of your bead to attach a clay jewellery finding later – or, use an electric drill with a small drill bit to add the hole after baking/curing. This way, you’ll avoid distorting the shape of your bead.
Once you’ve baked your polymer clay beads (see below), use the sand paper to smooth the surface and remove any rough edges.
How to bake polymer clay beads
Bake for around 10-30 minutes, depending on the size and thickess of your polymer clay bead and always bake at the temperature specified by the manufacturer. You may benefit from using a thermometer for a more accurate reading of the temperature.
Head to our blog for more guidance on how to bake polymer clay.
How to make polymer clay beads shiny
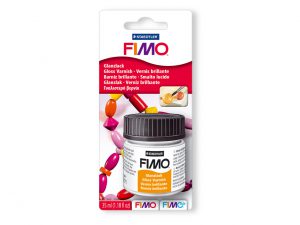
 Coating your polymer clay beads with a layer of water based varnish will add a glossy sheen to the surface. Before you apply the varnish, make sure that the surface of the bead is dry, clean and free from grease, dust or any other speckles of dirt. The varnish will be touch dry after 20 minutes, but fully dry after 24 hours, so make sure you varnish in plenty of time before putting together your jewellery pieces.
Creating patterns in your polymer clay beads
The millefiori or ‘caning’ technique allows you to create a distinctive, decorative pattern using several polymer clay tubes that are stretched and manipulated together. Used widely in glass working, building up your pattern in a cross-section will reveal the image when the clay is sliced – picture a stick of rock! Whether you’re using thin slices of clay to shape around a base bead, or free-handing your polymer clay to create your own free-style bead, ensuring that you’re not rolling too hard or quickly will help to maintain the pattern of the clay.
Looking for more texture? You can stamp or impress different textures and patterns into the raw clay to create interesting effects, such as old fabrics and wooden objects. Play around with glitters and other powders to add more colour and sparkle to your designs, simply brushing it on before you bake. Using gold leaf metal sheets or silver leaf metal sheets will help you achieve a unique pattern and finish to your design.
Our top tips when making polymer clay beads
- When combining other materials with polymer clay, it is important to check that the resources you are using are compatible. How? Do a test on a scrap piece of clay to check that the two materials don’t react badly with one another.
- When working with white clay, always clean your hands first – as it will pick up every speck of dust and can leave your design looking dirty.
- Remember, the heavier the bead, the harder it will be to use in jewellery making. Experiment with designs and shapes, but it’s best to keep to lighter pendants/beads.
- When baking, thread your beads onto a length of wire or a cocktail stick to suspend over the oven tray – that way you’ll avoid the clay sticking.
- If you have trouble removing your clay from a surface, use a flat knife.
Now you know how to make polymer clay beads, pick up everything you need from Cooksongold. From Fimo polymer clay tools to Fimo polymer clay sets containing all the coloured clay you’ll need. Get started on your polymer clay bead project today.
The post How To Make Polymer Clay Beads appeared first on The Bench.
source https://www.cooksongold.com/blog/how-to-guides/how-to-make-polymer-clay-beads
Comments
Post a Comment